English National Freestyle and Moguls Squad
Training Manual
Compiled By Scott Farby and Ian Freeman BSc
West Nottinghamshire College - Human Performance Unit
Completed - 25th October 2001
Contents of Manual
Nutrition for Sport and Exercise
Hydration in Sport
An Introduction and Foreword
Aim of the Manual
The Importance of Specificity
Section 1 - Cardiovascular Conditioning - Aerobic Base
Cycling
Running
Section 2 - The Abdominal Muscles - Core Training
The Sit-up
One Leg Raises
Trunk Lifts
Crunches
Section 3 - Plyometrics & Power - The Leg Muscles
30 second Box Drill
Zigzag Drill
Diagonal Cone Hops
Stadium Drill
Hip Twists
Lateral Thrusts
Ski Jumps
Lateral Steps
Section 4 - Flexibility - Static and Passive Stretching
Groin Stretches
Quadriceps Groups
Pelvic Muscle Group
Hamstring Group
Section 5 - Balance - Fore/Aft and Lateral Balance
One Leg Frontal Ski Squats
Beam Work
Core Strength Advantages in fore/aft balance.
Section 6 - Speed, Agility and Quickness - SAQ
The Sidewinder
The Viper
The Speed Resistor
Section 7 - Strength Work and Dynamic Flexibility
An Introduction and Foreword
Research has proved that not only adept technical ability is required in order to improve
skiing performance - fitness is also a key factor. The physical demands of skiing are
great, travelling at 40 mph downhill requires an unusual amount of balance, strength and
co-ordination. Therefore, improving the identified key fitness components of the skier
will surely improve his/her performance within the sport. This physical fitness combined
with the fine tuning techniques commonly learnt in skiing, will ensure that full potential
is reached. Through the results obtained from the testing carried out in May, August and
October of 2001, it is now possible to pinpoint specific areas of physical requirements
when skiing and therefore produce a programme which can be followed by the athlete in order
to improve the efficiency of these requirements, and thus become a better performer. This
compilation is not intended to be a specific training programme. There is not yet enough
thorough knowledge or test results to create a tailor made programme. A training programme
will be compiled in the near future containing a progressive training pattern of
ski-specific exercises, carefully laid out over a number of months to ensure full potential
is gained from the training. This particular booklet is a starting point, outlining some
useful exercises which can be carried out by any skier at any level, and is aimed at making
skiers aware of the large role which fitness can play in skiing success.
The Aim of the Manual
This training programme, the first in hopefully a progressive series of programmes, contains
various exercises and training techniques which can be undertaken by any skier at any level
of performance. The exercises are based on thorough research carried out on skiers from a
physiological and biomechanical point of view. They have been developed so that, over a
period of time, the more technical skills which account for the vast amount of the skier's
success will become easier, and can therefore be further developed without the restriction
of a poor fitness base.
The Importance of Specificity
Specificity means training particular muscle groups to perform a specific movement related
to the sport in question. The best way to train for a sport, therefore, is to train using
the movements carried out in that sport, ensuring that the mechanics of the movements are
part of the training. Skiers depend on good lateral movement of the legs, so training
routines to improve muscle strength should include lateral movements.
Section 1 - Cardiovascular Conditioning - The Aerobic Base
Why Train for an Aerobic Base?
An efficient aerobic system (i.e. aerobic energy, cardiovascular, and respiratory systems)
should be established by any sports person before embarking on a specific training method.
A solid base of aerobic power will enable an athlete to train more intensely and frequently
without over working the body. This means that the quality work which follows the aerobic
training will have a more positive effect on the body, and the athlete will be less prone
to the symptoms of over training and general fatigue.
Cycling
Cycling is an excellent exercise for conditioning the aerobic aspects of the skier's
fitness. Static or road cycling at low work rate (150 bpm maximum) for long periods of
time (1 hour minimum), 3 times per week will have a direct affect on the athlete's aerobic
capacity. Cycling also forces the individual to carry out a fixed movement which is
relatively non-stressful on the joints. Cycling can cause long term injury if posture is
incorrect or if it is carried out too frequently, as with any activity.
Running
Running is also a great activity for developing a solid aerobic base. Again, long periods
of low intensity jogging, keeping the heart rate around 150 bpm will cause an increase in
the athlete's aerobic efficiency over a period of time, and ready them for the gradual
introduction of more anaerobic work. In general, running leaves the athlete more open to
injury than cycling, in that there are a lot of stresses upon the lower body joints e.g.
knees, hips. Try to run on flat surfaces using cross-training footwear designed
specifically for running.
Follow the Training Procedure
Although this manual is not designed to be used as a specific step-by-step training
programme, there are still some fundamental principles to consider. It has already been
explained that training anaerobically with a poor aerobic base is not beneficial for the
athlete, and at worse could lead to over-training symptoms, fatigue, illness or injury.
When you have developed your aerobic base, it is important to slowly introduce anaerobic
work, while gradually decreasing aerobic base work. Try to concentrate on starting
anaerobic work such as plyometrics and strength work at low intensity, just to give your
body a 'taste', and increase the intensity from thereon, while at the same time slowly
decreasing aerobic work, but never discontinuing it altogether. In the end, you will be
training anaerobically at full intensity (downhill skiing is predominantly an anaerobic
activity), and maintaining an efficient aerobic capacity. Both types of training
complement each other.
Section 2 - The Abdominal Muscles - Core Training
Why the Abdominal Muscles?
Skiing puts an individual's balance to the most extreme tests. As most skiers understand,
balance is one of the most important components of fitness in skiing; a skier who is not
being efficient in generating the required forces with their skis on the surface is not
achieving optimum performance. To overcome opposing forces such as gravity and friction,
it is necessary for the skier to have total control over the body's movements. A strong
'core' (inner body muscles) will ensure that the skier is able to maintain a correct
posture and balance.
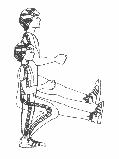
The Sit Up
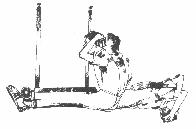
Despite being a very primitive exercise, sit-ups are, and always will be, the best exercises
for isolating the abdominal muscles.
Start:
Make sure that your ankles are stabilised by either a partner or a low beam (as in diagram).
Action:
With the hands behind the head or touching the sides of the head, bring the upper torso
to an upright position slowly, fall back towards the original starting position but do not
go all the way down. This will ensure that the muscles are worked maximally both
eccentrically and concentrically.
Guidelines:
Carry out the exercise slowly. 50 is a good starting point before resting for 1 minute.
Then do 25, then 15 then 10. Always try to work in this decreasing manner. Bend the knees
to work the lower abdominal muscles specifically.
One Leg Raises
Start:
Lie sideways on a suitable surface, a mat is preferable. Place your hands behind your
head and your ankles together.
Action:
Slowly lift the top leg to 30 - 40 degrees (at the hip). Hold for 2 seconds, before
lowering the leg back to the start position slowly.
Guidelines:
Do 20 on each side, then decrease load to 15, then 10, then 5, each set on the other leg
being an ample resting period.
Trunk Lifts
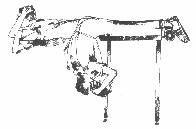
Start:
Find a table or preferably a gym bench 4 feet in height. Lie on your stomach, shuffling
forwards with someone holding your ankles secure, until your upper body (waist upper)
can flex at the hips 45 degrees without restriction (see diagram).
Action:
Place hands at the sides of the head and extend the hips so that the body is in a straight
position (your upper torso 'floating'). Hold for a couple of seconds before lowering the
body back to the start position slowly. Repeat this 20 times, decreasing in repetitions of
5 every set. Rest for 30 seconds between each set.
Guidelines:
Make sure your ankles are secure and that the table or bench is safe before even
considering this exercise. Do not stand up between each set as this will cause the
circulatory system to become 'confused'. When you finally do finish the last set of trunk
lifts, stand up slowly, and have assistance near by in the form of a partner, or a solid
object.
Crunches:
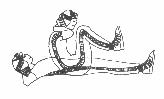
Start:
Lie down, on a suitable surface (mat) with hand behind head.
Action:
Sit up and bring the knees towards you at the same time, finishing in the position shown in
the diagram.
Straighten the legs out in front of you and fall back towards the starting position, but do
not let either the legs or the upper part of the back touch the floor. Repeat the
movement 25 times to start with, decreasing the repetitions by 5 every set until the last
set equals 5 reps.
Guidelines:
This exercise is explosive but at the same time controlled. Sit up quickly, bring the knees
up quickly work to slow the body down when falling into the start position. This
exercise must be carried out in conjunction with regular trunk work such as leg raises,
sit-ups and trunk lifts in order to maintain a balanced range on movement at the hip
joint.
Section 3 - Plyometrics and Explosive Power - The Leg Muscles
What is Plyometrics?
Plyometrics is a technique which is implemented in order to promote power gain in the
muscles. The exercises associated with plyometrics can be varied, but are very similar
in their function or goal. The exercises tend to produce a successive 'coil and spring'
movement e.g. bounding into bounding. The idea is that the force of gravity or the end
potential of the previous bound or jump will exert greater force (body weight, momentum
etc.) and therefore more of a resistance when going into the next bounding movement. This
way, the overload principle is met, and due to the nature of the movement, power gain is
promoted in the long term.
30 - 90 Second Box Drill:
Equipment:
A box 12 inches high, 20 inches wide and 30 inches deep.
Start:
Stand at the side of the box with feet shoulder width apart.
Action:
Jump onto the box laterally, on to the ground on the other side, then back onto the box.
Continue to jump onto the box for an allotted time, with each jump onto the box counting as 1.
Guidelines:
30 touches in 30 seconds (start of training)
60 touches in 60 seconds (progression after 4 weeks)
90 touches in 90 seconds (introducing power endurance)
Zig Zag Drill:
Equipment:
2 parallel lines 24 to 42 inches apart and 10 metres long
Start:
Position yourself balanced on one foot on a line
Action:
>From your starting position jump diagonally forwards onto the opposite line from one foot
to the other and then back onto the other line (still forwards - diagonal) onto the
opposite foot. Do at maximum work rate for 10 metres.
Diagonal Cone Hops:
Equipment:
A row of 6 to 10 cones or small markers 3 to 4 feet apart.
Start:
Stand with feet together at the end of the line of markers (looking down the line).
Action:
Keeping ankles together, jump in a zigzag fashion across the front of the cones until the
end cone is jumped.
Guidelines:
Perform exercise at maximum work rate. Walk back to the start and repeat the exercise.
Do 10 sets.
Stadium Drill:
Equipment:
Stadium Steps or bleaches.
Start:
Stand in a quater-squat position at the bottom of the steps with hand on hip or behind the
head.
Action:
Jump with two feet to the first step and continue for 10 steps. Each landing should be in a
quarter to half squat position, and jumps should be made quickly (no obvious pauses).
Guidelines:
Do not carry out this exercise when fatigued. Do 5 sets with a walk-back rest between each.
Work at 100% at all times.
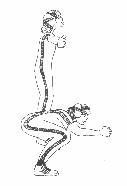
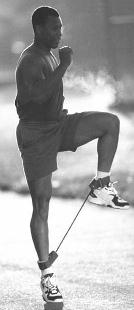
Hip-Twist Ankle Hop:
Equipment:
No equipment required
Start:
Stand with feet shoulder width apart, knees slightly bent with body in a vertical position.
Action:
Jump and twist the hips 90 degrees so that the feet face west on landing. On the next jump,
turn the hips 180 degrees to face the feet east on landing. Continue to twist the hips 180
degrees through simultaneous jumps and landings.
Guidelines:
Try to restrict movement of the upper body as much as possible. Twist at the hips. Do 20
jump - twist - lands before resting for 10 seconds. Repeat 5 - 6 times.
Lateral Thrusts:
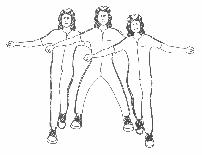
Start:
Stand with feet shoulder width apart, with ample space around for lateral movement
(3 metres minimum).
Action:
Jump to one side, still facing forwards (the upper body does not twist or face any other
way throughout the exercise). Land on the outside foot, and bound back through your
original plane of movement, onto the other foot. Continue to do this for 10 - 15 seconds
at full intensity.
Guidelines:
You may want to take up the skiing position in order to emulate the movement more
realistically. Bound short distances to start with, and extend the bounding as
momentum and rhythm comes into play.
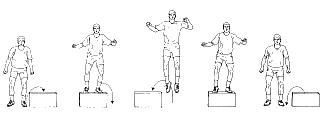
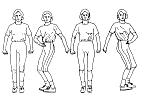
Ski Jumps:
Ski jumps enable the body to become used to utilising the muscles correctly in order to
execute a jump exactly how it may be from a skiing position. This is simply a regular
skiing movement, repeated and executed in a way which puts it in the category of
plyometric training.
Start:
Start with feet shoulder width apart, make sure that there is plenty of room above for a
safe jump.
Action:
Squat into the ski jumping position and jump straight up into the air. On landing, squat
straight back into the start position,, before thrusting the body into the air once more.
Repeat for 10 - 15 jumps, rest for 30 seconds between each set, carry out 5 or 6 sets.
Guidelines:
Do not carry on unless you are working at 100% of your maximum working potential.
Fatigue not only increase the chances of injury through poor technique, but also wastes
power training potential as it is not encouraging the correct muscle adaptation (training
exercises to increase power must be carried out at full intensity - explosive and fast).
Lateral Steps:
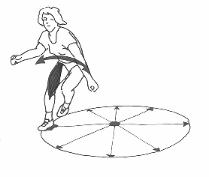
Excellent exercise for improving proprioception and balance with the added advantage of
strength gain.
Start:
Stand in the middle of a circle 3 metres in diameter, with markers spaced out along the
circumference every 50 cm
Action:
Jump laterally landing at a marker with the outside foot. Rebound straight back as quickly
as possible into the centre, landing on the opposite foot. Carry out this process,
jumping towards the next marker in an anticlockwise manner. Work flat out for 1 minute,
rest for 2 minutes. Carry out 4 sets, working at 100% at all times. Repeat in a clockwise
direction.
Section 3 - Flexibility
Why Train for Flexibility?
All sports require a good range of flexibility, not only for optimising performance, but
also to prevent injuries. A skier carries out a series of sharp, ballistic movements on a
'downhill', which put the joints and muscles under great strain. Flexibility at the main
joints which absorb these stresses (hips, knees), will limit the probability of muscle
strains or joint sprains. From a performance point of view, good flexibility at all joints
will give the skier more appealing style in aerial and mogul manoeuvres e.g. better
looking 'daffy' if hip flexors and abductors are flexible. Flexibility with strength is an
effective arsenal for any skier, and as flexibility is liable to deteriorate when strength
training is carried-out, exercises should be continuous and frequent (every day if
possible).
Static and Passive Stretching
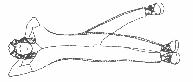
Groin Stretches:
#1:
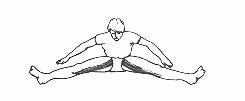
Action:
Sit on the suitable floor surface such as a gym mat, and find an immovable object such as a
wall. Slowly push your feet along the wall in opposite directions to obtain a 'splits'
position which is comfortable. A comfortable position means no pain, but you can feel the
groin muscles (illustrated as black on the diagram) are taut. Gently, WITHOUT BOUNCING,
reach for each foot with the hands to further stretch the muscle, hold in a position which
is painless. Hold for 1 - 2 minutes before resting and repeating 4 times.
Guidelines:
Make sure the lower back does not become painful. If it does, stop reaching, and use the
feet shuffling method to gain more of a stretch, keeping a straight back.
#2:
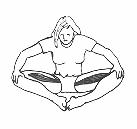
Action:
Sit on a suitable surface. Bring the ankles towards the body with the sole of each foot
touching. Assist the ankles into the body using your hands if you feel comfortable
doing so. Staying in the 'meditating' position, gently push down on the knees to stretch
the upper section of the groin muscles (illustrated in black on the diagram).
Push until you feel the muscles are well taut, and DO NOT exceed the range of movement into
a 'pain zone'. Hold the position for 1 - 2 minutes, before resting and repeating.
Do this exercise 4 times.
Guidelines:
Again, ensure the lower back is not put under stress too much. If the lower back begins to
become painful, straighten the back more.
The Quadriceps Group - The Thighs
#1:
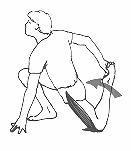
Action:
Get down into an 'on your marks' position, kneeling down, with hands on the ground at the
side of the body, one knee on the ground level with the waist line. Grab the left ankle
with the right hand and bring the foot up to a state where the left knee is flexed 45
degrees. Slowly lean back until the thigh becomes fully stretched. To increase the stretch
further, gently pull on the ankle to narrow the angle of the knee.
Hold the stretch for 1 minute, rest for 30 seconds before repeating the exercise 4 times.
Repeat on the right leg.
Guidelines:
This exercise can cause pain in the hip joints if the correct posture is not taken.
Make sure the trailing leg (the one which is stretched) is parallel with the rest of the
body and especially the other leg. This will ensure that the hip joint is not being rotated
as well as flexed.
#2:
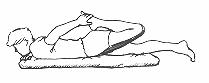
Action:
Lie on your stomach on a soft surface as shown in the diagram. Straighten both legs behind.
Flex the right knee so that the ankle can be reached with the right hand and grabbed
without twisting the body (right leg, right hand). Get someone to assist you if this cannot
be achieved on your own. Pull gently on the ankle towards the right shoulder until the
knee lifts from the floor. Pull until the whole of the upper leg is off the surface if
possible. DO NOT pull if any joints become painful. There is a subtle difference between
taut muscle and pain. Hold the position shown in the diagram for 1 minute, alternate the
legs for the exercise and carry out 4 stretches on each leg (effectively a 1 minute rest
between each exercise on each leg).
Guidelines:
Do not continue if back pain arises. Try not to pull down on the ankle as this will pull
the femur (thigh bone) away from the knee joint, causing pain and possible long term damage
if repeated frequently.
The Pelvic Muscle Group:
If aerial manoeuvres are to be perfectly executed, the pelvic muscles must be supple.
These muscles are responsible for stabilising the lower section of the body in a split
position such as a daffy. As with all movements, one muscle group always works against
another, the hip flexors work against the groin muscle group, which are responsible for
adducting the legs (bringing them back in towards the body). The more supple the pelvic
muscles, the better the range of movement at the hips. In conjunction with excellent core
strength, flexibility of the hip related muscle groups can produce quality performance in
the air.
The Exercises:
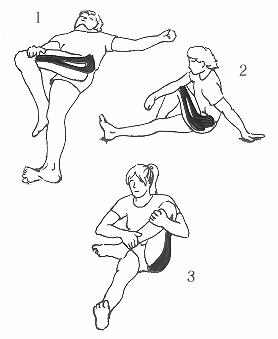
1: Lying Pelvic Stretch
Lie flat on your back on a suitable surface. Bring one knee towards the shoulder of the
same side and slowly place the flexed leg over the other leg, resting the inside of the leg
on the thigh of the relaxed limb. Gently push down on the knee of the bent leg as shown in
the diagram. This exercise isolates the upper hip flexor group.
2: Sitting Pelvic Stretch
Sit on a suitable surface, with your arms out behind your legs out straight in front. Take
one leg and place the foot over the other relaxed straight leg which stays on the floor.
Place the foot level with the knee of the relaxed limb, any further down and there is a
possibility of producing an unwanted force in the exercise, which could cause pain. Place
the elbow of the opposite arm (in relation to the leg being stretched) on the outside of
the knee. Gently assist the knee further towards its oppositeside as shown in the diagram.
3: Lower Pelvic Group Isolation
This exercise concentrates on stretching the lower pelvic muscle group. Sit
down with legs relaxed straight in front. Bring one leg towards the body using the
assistance of the arms (see diagram). Gently pull the ankle of the flexed leg towards it's
opposite side until the hip flexors become taut. DO NOT pull to the point where the knee is
put under lateral stress. The more flexed the leg the better.
Guidelines:
Carry out each stretch on all exercises for 1-2 minutes, and do 3-4 sets with a 1 minute
rest between. Don't forget to carry out groin work as well, as both complement each other.
The Hamstring Group:
#1:
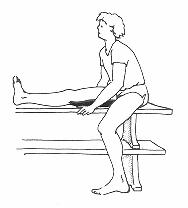
Action:
Start in a seated position on a bench or table, long enough for one leg to be placed
straight on the surface (as in diagram). Slowly lean forward until the hamstring muscles
(illustrated as black on the diagram) become taut. DO NOT continue if lower back pain is
present. Lean forward very gradually until you feel you are at your range of movement
'limit' i.e. the muscle is fully stretched to its capabilities. Hold the stretch for 1 - 2
minutes before stretching the opposite leg. Do 3 or 4 sets on each leg.
Guidelines:
Ensure that the leg being stretched is totally straight. Not only will the stretch be less
effective if the leg is bent, but it will also make it possible to lean further
forwards, possible causing lower back stress.
#2:
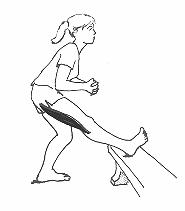
Action:
Start in a standing position with one heel placed on a surface 1 foot from the floor. Bend
the standing leg slightly and point the toes of the other leg upwards i.e. flex the ankle
(as shown in the diagram). Keeping the leg straight, gently lean forwards, decreasing the
angle at the hips, until the hamstring group becomes fully stretched. Hold the position for
2 minutes. Stop if pain is present and reassess your technique / posture.
Guidelines:
Concentrating on bending the standing leg slightly will limit the amount of leaning
required to get the muscle taut, thus saving the lower back from unnecessary stress.
Pointing the toes of the legs being stretched will isolate the section of the hamstring
which runs through the knee joint to the lower leg section, an area very difficult to
stretch.
#3:
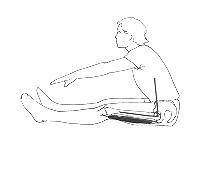
Action:
Sit down with your legs straight out in front of you. Keeping the legs straight, gently
reach towards your toes with your hands (don't assume you have to actually touch the toes
for the stretch to be effective). Gradually feel down the front of the shins towards the
feet until you feel the hamstrings are fully stretched. This should be a comfortable
position, not one which produces lower back pain. If pain in the lower back is present,
try to straighten the spine more.
Guidelines:
Get into a position where you can breath correctly. Highly flexible athletes can sometimes
reach so far that the diaphragm becomes restricted. Don't forget that this stretch needs to
be held for 2 minutes, so it may be useful if breathing is made possible!
Section 5 - Balance
Why Train for Balance in Skiing?
Balance inter-links with many of the other exercises' goals in this programme, for the
simple reason that it is such an important fitness component to perfect if performance is
to be of top quality. Strength exercises involving the upper body and the core all help to
give extra control over fine movements and to overcome opposing forces, but the
neuromuscular system needs to be trained for the skier to be totally controlled. Balance
exercises promote a good neuro - muscular relationship. If the two systems are constantly
made to work in unison in order to prevent the person falling, they will adapt to give
greater control and better co-ordination, thus balancing skill will increase.
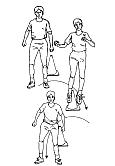
One-Leg Squats
Start:
Stand up straight, balancing on one leg, the other leg straight out in front at an angle of
45 - 60 degrees (at the hip).
Action:
Slowly squat down on the standing leg, keeping the other leg straight and off of the floor.
Go into a half squat and hold for 5 seconds. Slowly push up off the standing leg into the
start position.
Guidelines:
Have the arms in the classic ski position in order to emulate the balance correctly in
relation to the activity. Try at first not to go too far down, as the power required to get
back into the original starting position increases as the knees becomes more flexed.
This is a balance exercise, not necessarily a power gaining exercise, although it will
increase strength in the legs over time. Keep the back straight at all times (Russian
dancing style).
Beam Work:
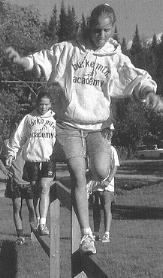
Start:
Make sure the beam is not too high (3 foot maximum), and that there is an adequate landing
surface (mats are preferable here). Stand facing down the beam.
Action:
Step onto the beam with one foot, using your arms for balance. Slowly make your way across
the beam placing one foot carefully in front of the other until you reach the other end.
Guidelines:
Use a wide beam if you are not used to balancing exercises, a gym horse (5 inches in width)
is a good starting point. Make the distance longer and the beam more narrow as you become
adept in performance. Try to use a beam which consists of a soft material such as suede, but
at least make sure the material is smooth in order to prevent the probability of injury
(grazes, splinters etc.)
The Importance of Core Strength in Fore and Aft Balance
Skiing offers a constant challenge to the performer in maintaining his/her balance in an
fore/aft plane. If the skier goes into the 'back seat', it is the abdominal muscles which
need to be strong enough to recover correct posture. These muscle and the opposing muscles
in the lower back are constantly working against each other on the 'downhill', therefore
it is important to develop a balance in the two groups. If you train extra hard on
strengthening the abdominal muscle group, you must make sure that you train extra hard
strengthening the muscles of the lower back. Singling one group out and ignoring their
counter parts can result in long-term postural related injury.
In order to improve fore and aft balance, the core must be strengthened, and then must be
made to work on the slope in order to become accustomed to the contractions which are
regularly required to keep the skier posturally correct. Only leg based training should
get more attention in skiing then core strengthening and lateral balance work.
Section 6 - Speed, Agility and Quickness - SAQ
What is SAQ?
SAQ is a recent training technique which utilises equipment and exercise methods which are
aimed at making the body become faster, react quicker and be more explosive. The equipment
is designed to promote fast leg work e.g. low hurdles, floor ladders, sometimes with
resistance (stretch cords). The goal of the training from a physical point of view is to
enhance the 'brain impulse to muscle fibre' process, and the technique uses clever methods
in order to 'trick' the body into overloading the process, thus improving its efficiency.
Otherwise, the technique is very explosive power orientated, and all work is carried out
at 100% work rate to obtain the full potential of the training - sharp, fast and precise.
Most of the SAQ equipment can be added into regular plyometric/explosive work to add a
resistance e.g.. Sidewinder (described below) can be used in diagonal cone hops (explained
earlier in the plyometrics section).
The Sidewinder
The sidewinder is designed specifically to induce resistant force on the muscle associated
with hip adduction (lateral leg movement). As lateral leg movement is not all that common
in most sports, it never gets properly developed. The sidewinder will increase the reaction
time and the explosivness of lateral movement or force generation, vital for skiing.
Start:
The sidewinder has many uses, the most common exercise associated with this versatile piece
of equipment is side stepping. Start with feet shoulder width apart.
Action:
Side step diagonally forwards (1.5 metres to the left, 1.5 metres to the right) with the
left leg, and on landing, do exactly the same with the right leg (1.5 metres to the right,
1.5 metres forwards). Try to increase the distances as momentum picks up. Do this for 20
metres and 100% work rate - flat out, before walking back for another 5 attempts
(rest for 30 seconds to 1 minute between sets).
Guidelines:
Refer to the plyometrics section and the Zigzag drill diagram for a greater understanding
of the movement required. Get used to the resistance which the sidewinder exerts before
carrying out exercise at full intensity.
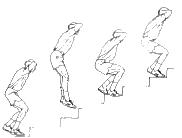
The Viper
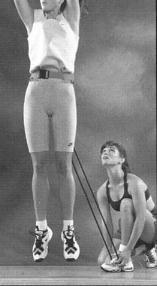
The Viper is designed to apply resistance to a vertical movement without hampering the
actual mechanics of the movement. The resistance which weight machines would exert are
still present, but the movement is more controlled, therefore specificity principle is met
(see page 1 for specificity principle background).
Start:
Fasten the Viper belt around the waist line tightly. Securely fasten the end of the cord to
the ground (as in diagram, a partner will do).
Action:
Jump straight up vertically, squatting on landing before jumping straight again, following
the same principle as with the plyometrics exercises discussed earlier.
Guidelines:
Make sure that the end of the cord is secured on the floor relatively close to the body,
so that the cord does not pull you backwards when you are in flight. Work at maximal
intensity, for 10 - 15 jumps with no pauses in movement (jump - squat - jump). Rest for 30
seconds before carrying out another 5 sets.
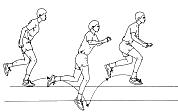
Speed Resistor
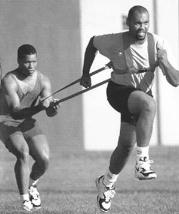
The Speed Resistor is another SAQ exercise which integrates resistance work (stretch cord)
with neuro-muscular association training (decreasing the impulse-to-muscle time, thus
faster reactions).
Start:
Secure the harness tightly around the upper body. Get your partner to hold the end of the
stretch cord, but be close enough to him/her so that it is slack.
Action:
Start sprinting away from your partner as fast as possible. As the cord tightens, your
partner should pull slightly to add resistance.
Guidelines:
Sprint for 30 - 40 metres, have a 'walk-back rest' before repeating 4 times. Do not carry
out the exercises, and indeed any SAQ exercise, if you are not working at 100% intensity
i.e. you are fatigued. Stop on the run in which you begin to feel an obvious deterioration
in performance. Your partner should pull just enough to add resistance, without hampering
the runner's style i.e. slowing him/her down to a halt, but also concentrating on keeping
the cord taut.
Section 7 - Strength Work and Dynamic Flexibility:
The exercises throughout this manual can all be used to improve the strength and staying
power of a skier. The plyometric exercises are excellent for strength work, as are the SAQ
exercises, because they work the correct muscle groups specifically while at the same time
ensuring mobility is present, and that the limbs work through a large range of movement
(ROM). This is known as dynamic flexibility, where the joints are moved towards their full
ROM dynamically, but safely in one smooth, controlled movement, instead of the 'bouncing',
ballistic style which was once advised by top trainers, but is now frowned upon as an
invitation for injury. As the muscles become stronger through resistance training e.g.
weight based training, the muscles become larger and shorter. Dynamic flexibility work
integrated into regular exercises ensures that the resistance factor is met (plyometrics
concept, resistance cords in SAQ work), but also that the muscle keeps it's suppleness as
it is not allowed to become shorter (it is kept elongated through the large ROM involved
in the exercises).
Strength Training
Different types of training can use the same exercises. Plyometrics has been centred in on
as one of the most important training methods for improving skiing fitness. But it is the
nature of the work carried out, the intensity, the duration and the work load that dictates
what type of fitness is to be improved (strength, power, endurance etc.). The exercise
itself is simply a technique which can be adopted to work specific muscle groups.
When training for strength, the resistance needs to be high, the intensity level high but
controlled, and the duration low. Strength endurance work needs to include an ample level
of resistance in order to 'overload' the muscles, but also needs a long enough duration to
let the body know that it is not efficient enough to carry out high intensity work for
relatively long periods. Tthis is how the body adapts to become stronger. Strength
training adaptation will allow the athlete to use more resistance in the more ski-specific
power work, thus strength may be seen as a building block for power-based exercises.